What happens if your system hard drive—the drive that
stores the system partition and the operating system files—fails?
That’s quite problematic not only because you no longer have access to
Windows Home Server, but because you lose access to the shared data and
client backups. The good news is that, as long as you have at least one
complete system backup, you can replace the hard drive with another one
and then use the Windows Home Server DVD to make a complete recovery.
Determining the System Hard Drive
Before going any further, if you have multiple
internal hard drives installed on your Windows Home Server machine, you
do need to know which of them holds the system partition. In previous
versions of Windows Home Server, you could use the Console to determine
the system drive, but the Windows Home Server 2011 Dashboard doesn’t
offer this feature, so you need to follow these steps, instead:
1. | Click the Server Manager icon in the taskbar to launch the Server Manager.
|
2. | Open the Diagnostics, Device Manager branch.
|
3. | In Device Manager, open the Disk Drives branch.
|
4. | Double-click a hard drive to open the drive’s Properties dialog box.
|
5. | Click the Volumes tab.
|
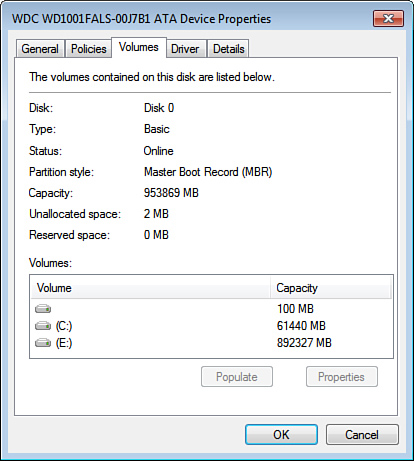
6. | Click
Populate. Device Manager populates the Volumes section with a list of
the partitions on the drive. If you see drive C: in that list (as shown
in Figure 1), then you’ve found your system hard drive. If not, click Cancel and repeat steps 4-6 until you find the system drive.
|
Replacing the System Drive
Here are the steps to follow to replace your system hard drive and reinstate Windows Home Server:
1. | Shut down the Windows Home Server computer, if you haven’t done so already.
|
2. | Replace the failed system hard drive with a new hard drive.
Caution
The order in which the drives’ data cables are
connected to the motherboard determines the order of the drives on the
system. Because your new hard drive must be the first hard drive, be
sure to connect the new drive in the same position as the old drive.
|
3. | If
the system image backup of the server resides on an external drive,
make sure that drive is attached to the server and powered up.
|
4. | Turn on the computer, and insert the Windows Home Server installation DVD.
|
5. | Boot
from the DVD when your system prompts you. Setup loads the installation
files and then displays the Installing Windows dialog box.
|
6. | Click Repair an Existing Installation. The Select a System Image Backup dialog box appears.
|
7. | Select
the Use the Latest Available System Image option, and then click Next.
Setup displays the Choose Additional Restore Options dialog box.
Note
The most recent system image backup is usually your
best bet, but you can use an earlier backup if you prefer. In the Select
a System Image Backup dialog box, choose the Select a System Image
option, click Next, and then click the backup you want to use. If the
backup resides on a network share, click Advanced and then click Search
for a System Image on the Network.
|
8. | If
your replacement system drive is not new, you should select the Format
and Repartition Disks check box. If you have multiple hard drives and
you don’t want Windows Home Server to format one or more of these
drives, click Exclude Disks, activate the check box beside each drive
you want to exclude, and then click OK.
|
9. | If
your server has multiple hard drives, you can save time by telling
Setup to only restore the system drive by activating the Only Restore
System Drives check box.
|
10. | Click Next.
|
11. | Click Finish. Windows Home Server begins restoring your system.
|